What is DirBuster?
DirBuster is a content discovery application within the Kali Linux and Parrot OS repository. DirBuster was created OWASP Foundation and managed by Kali Developers. It is widely used to brute force and extracts juicy lists of directories and files. This tool is written in the Java programming language.
It uses multi-thread functionality, which gives users the advantage of extracting directories and files faster or slower. We will provide you an overview of the tool and its fundamental functionalities in this post.
How to download DirBuster in Linux?
DirBuster comes preinstalled in both Kali Linux and Parrot Security OS. So we will see how to download the tool in any other Linux distributions like Ubuntu.
Clone the repository of the tool from GitLab using the command in the terminal-
git clone https://gitlab.com/kalilinux/packages/dirbuster.gitMove the DirBuster directory to opt directory:
sudo mv dirbuster /optThe opt directory is used to install unbundled packages, which come from sources other than the ones included with the OS installation. It’s for third-party, external packages.
Inside the application directory, you see a bash script named DirBuster-1.0-RC1.sh. We will give executive permission to the bash script by writing the command:
sudo chmod +x DirBuster-1.0-RC1.shJust run the file using the below command:
./DirBuster-1.0-RC1.shHowever, manually navigating the DirBuster directory and running the script is inconvenient. We relocated the folder to the /opt directory — to make things easy for ourselves. Please continue if you want to complete the process of making your life simpler.
Make a new file for aliases. If you don’t already have one- sudo nano /.bash aliases, add a new alias-
alias dirbuster='source /opt/dirbuster/DirBuster-1.0-RC1.sh’To make the changes take effect, restart the terminal/ssh session or run the command in the terminal.
source /.bash aliasesSuppose you run dirbuster from a directory other than /opt/dirbuster. In that case, you will see the error Error: Unable to access jar file DirBuster-1.0-RC1.jar. The shell script searches for a jar file in the current directory rather than utilizing the complete path.
Change the second line of the /opt/dirbuster/DirBuster-1.0-RC1.sh script:
java -Xmx256M -jar /opt/dirbuster/DirBuster-1.0-RC1.jarRestart your terminal session and type dirbuster into the terminal. The DirBuster should now begin at any location of the terminal.
Options or Parameters in DirBuster
Before learning how to scan a website, we will learn about all the options or parameters provided in the application.
#1. Default Mode
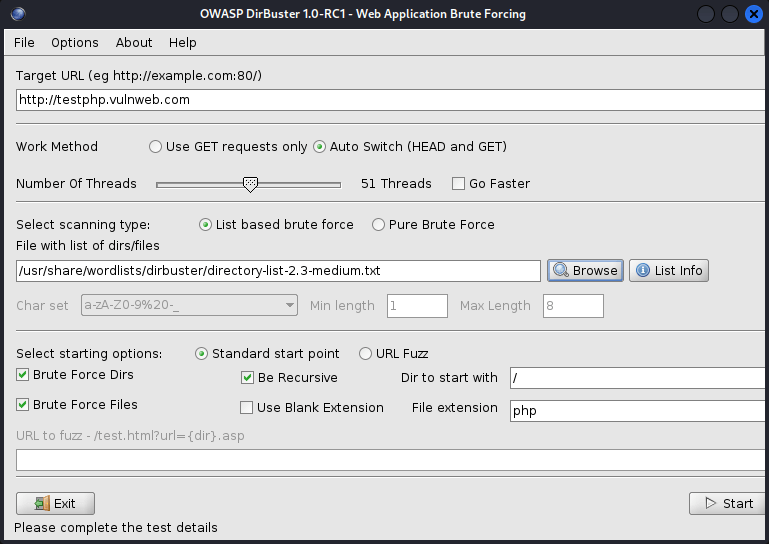
If the user only inputs the target URL field and path of the wordlist file. Leave the rest of the options as they are known as Default Mode. By default, the application will work on auto-switch between HEAD and GET requests to perform a list-based brute force attack. It will work on 10 threads.
#2. Target URL
In this field, the user will enter the URL path of the target which they want to brute force.
#3. Work Method
a. Use GET requests only
With this option, the application will scan only those files and directories wich use the GET request type. With this option, the scan speed will be faster, but the result is inaccurate. You will miss some of the excellent information.
b. Auto Switch (HEAD and GET)
With this option, the application will scan files and directories which use both HEAD and GET request types. Here, auto switch means that the application will be switching between HEAD and GET methods to brute force for both. The scan result will be more accurate with this option, but the scan speed will be slow.
#4. Number of threads
Here users can enter how many threads they want to use while brute-forcing. Threading is used to scan faster. A high number of threads means the scan will complete faster and for low is vice versa.
Next to threads, you can see a checkbox named Go Faster. If the user checks this box, the thread will automatically go to a high number. This tool may need a good graphics card for threading and not be laggy.
#5. Select Scanning Type
You get two different types of scanning:
- Line-based Brute Force
- Pure Brute Force
Line-based Brute Force: In line-based brute force, the user can provide a specific wordlist from default tool’s wordlist directory or custom wordlist to brute force directories and files.
The location of Dirbuster’s wordlist is “/usr/share/wordlists/dirbuster/”. The best and recommended wordlist for a complex and big website is directory-list-2.3-medium.txt.
The best and recommended wordlist for a simple website is directory-list-2.3-small.txt.
Pure Brute Force: This application allows for a wide range of control over the attack process. We will only use numerals to perform a pure brute force attack in this set. Selecting “Pure Brute Force” in the scanning type option and “0-9” in the charset drop-down menu does this. The minimum and maximum character limits are defined by default, but the user can change them. Pure brute force is not recommended because it doesn’t work at all in some cases.
#6. Select Starting Options
Under this option, the user can choose Standard Start Point or URL Fuzz.
Inside Standard Start Point user has the flexibility as follows:
Brute force dirs: Check this box if a user wants to know all the directories inside the server.
Brute force files: Check this box if the user wants to know all the files inside the server.
Be recursive: When this option is enabled, the scan will be recursive for each directory detected, which means that if the scan discovers the directory /direct, it will repeat the whole scan. For example, if a user uses a list, it will repeat for each list option in that directory.
Dir to start with: This option benefits users from searching specific and sensitive directories.
Use blank extension: DirBuster may also examine folders with an empty extension, which may reveal material that would otherwise go unnoticed. We have to check the “Use Blank Extension” option.
File extension: This application will look for the file extensions and extensionless files in the case of active Use Blank Extension. However, each file extension will lengthen the scan time because This will perform the complete scan wordlist brute force set for each extension.
Add several extensions by separating them with a comma and a space. (For example, using the option php, html, jpg, txt will look for files with the extensions “.php”, “.html”, “.jpg”, or “.txt”).
When choosing file formats, keep in mind the type of server used.
For example, having php files may benefit an Apache webserver because Apache is built on PHP.
Now it’s time to look option under URL Fuzz.
URL to fuzz: This allows the entry to be inserted in a non-standard manner. Non-standard option; if not chosen, see Standard Start Point.
The URL to begin the fuzzing process. The insertion by DirBuster is indicated by dir.
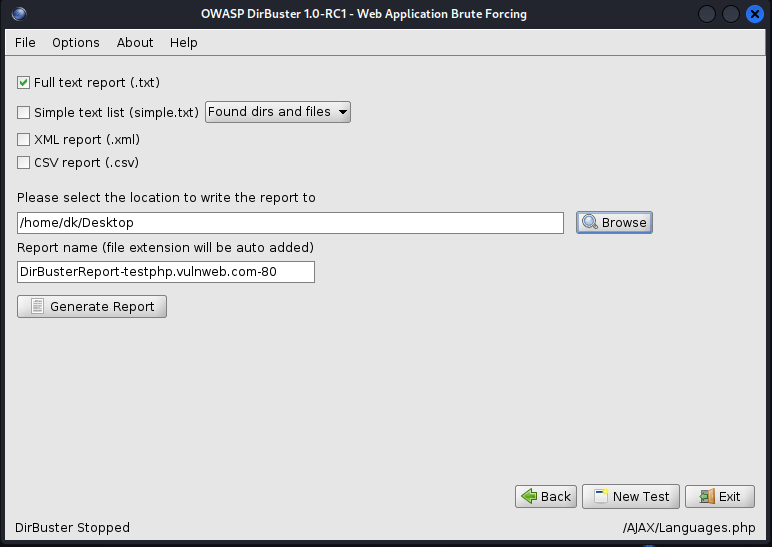
Generating Report: When the scan is finished, or you stop it, the Report button, which is disabled while the scan is running, will be activated. The report box allows you to export the scanned URLs of the detected folders and files in several formats, such as plain text, XML, and CSV.
Let’s see how to use DirBuster practically.
We will use a vulnerable website, Home of Acunetix Art, to see which files and directories we will get.
Target URL:
Work Method- Auto Switch (HEAD and GET)
Number Of Threads- 50
Select Scanning Type- List-based brute force
File with list of dirs/files- /usr/share/wordlists/dirbuster/directory-list-2.3-medium.txt
Select Starting Options- Standard start point
Checked Options- Brute Force Dirs, Be Recursive, Brute Force Files
Dirs to start with- /
File Extension- php

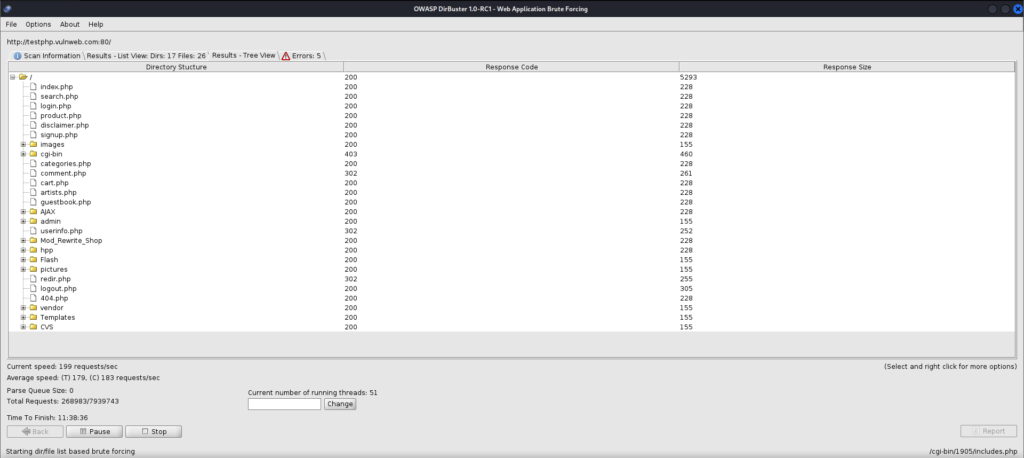
Now, we will look into the result in the tree view we got.

Simply fill out the form and click Generate report to save it locally and for future use. We will save it in .txt format in the Desktop directory.

Practical Video
For more articles related to different linux tools follow this link.


