Nmap, or Network Mapper, is a free and open-source security auditing. It is created by Gordon Lyon.
Nmap is built to quickly diagnose both massive networks and single hosts. In simple words, it is a port scanner used by many cybersecurity experts.
Network administrators use Nmap to determine:
- It can find the host that is connected to the network.
- It can detect open ports on the host.
- It can identify all services running on the target host, as well as the operating system and version.
- It can detect some weaknesses or potential vulnerabilities in the network system.
Nmap is a command-line tool, and for a graphical user interface, we can use Zenmap.
What is Nmap?
Nmap stands for Network Mapper, a free network discovery and vulnerability scanning tool.
Network administrators may use this tool to monitor single hosts and large networks with hundreds of thousands of devices and subnets.
Though it has grown and become incredibly versatile over the years, at its core, it is a port-scanner that gathers information by sending raw packets to system ports. It waits for answers and detects whether ports are open, closed, or filtered by a firewall.
Port scanning is also known as port discovery or enumeration.
How to download Nmap?
Installing on Linux
Firstly, Nmap is installed by default in Kali Linux and Parrot Security OS. You can download this tool in any Debian distribution with these steps. To see how to download, we use the Ubuntu operating system.
Step 1: First, we check for updates to the operating system’s repository by typing “sudo apt-get update” in the terminal. If there is any update available, it will update all packages.
Step 2: Now, it’s time to install Nmap. Type “sudo apt-get install nmap” in the terminal.
Step 3: Nmap is installed. To check if this tool is installed, type “nmap –version”. It will show the latest version of Nmap.
Installing on Windows
Step 1: Open a web browser and navigate to the Nmap official website, then visit the downloads page. You can find the setup file called nmap-7.92-setup.exe.
Step 2: Now run the downloaded executable file.
Step 3: After clicking the executable file, a prompt will ask you to confirm to make changes to your system. Click Yes.
Step 4: Click on the I Agree button on the License Agreement.
Step 5: In the next screen, they will be asked to choose components. Don’t change anything, click on the Next button.
Step 6: You can choose the location for Nmap installation. By default, it uses the C drive, but you can change it to another drive or folder. It requires 84.3 MB of memory space in the drive.
Step 7: After the installation, it will take a few minutes to complete.
Step 8: After the installation completes, install Npcap. The license agreement appears. Click on I Agree.
Step 9: In the next screen, different installation options appear. Just click on the Install button.
Step 10: The installation process will take a few minutes.
Step 11: After completing the installation, click Next.
Step 12: Click the Finish button after installing Npcap.
Step 13: The Nmap installation is now complete. Click on the Next button.
Step 14: Now, just ask to create shortcuts in the Start menu and Desktop. It’s a matter of personal opinion whether to create or not.
Step 15: The Final screen appears, saying installation is finished. Click on the Finish button.
How does Nmap work?
Nmap searches a network for hosts and services. When a host or service is discovered, the tool sends information to that host or service and receives a response. It receives and analyzes the answer, then uses the data to generate a network map. The map provides specific information on what each port is doing and who or what is using it, how the hosts are connected, what is and is not passing through the firewall, and any security concerns.
It uses a comprehensive scripting framework that communicates with every network component. The scripts serve as a means of communication between network components and their human users. Nmap’s scripts can detect vulnerabilities, detect backdoors, exploit vulnerabilities, and discover networks. It is a really powerful piece of software. Still, it takes a lot of prior knowledge to use it effectively.
It may be used by cybersecurity businesses to scan a system and identify vulnerabilities that a hacker might exploit. Because the application is open-source and free. It is one of the most widely used tools for scanning networks for open ports and other vulnerabilities.
For a better understanding of how Nmap works, we will see a flowchart:
- The user will give the input host’s IP address and other parameters.
- Nmap connects to the host using the operating system kernel.
- First, it will check whether the host is alive.
- If the host is active, the host will respond. Otherwise, no connection will develop between them.
- After the host responds, it will ask for all details related to the host, such as the hostname, ports (open, closed, or filtered), the operating system in use, etc.
- After gathering all the details, this tool will generate a network map.
In the end, Nmap shows the network map to the user.

Types of ports recognized by Nmap
There are six different types of ports recognized by Nmap:
- open
- closed
- filtered
- unfiltered
- open|filtered
- closed|filtered
Open ports: On this port, an application is actively accepting TCP connections, UDP datagrams, or SCTP associations. The primary purpose of port scanning is frequently to find them. Security-conscious individuals understand that each open port is a potential point of attack. Attackers and pen-testers exploit open ports, while administrators attempt to block or secure them using firewalls without interfering with legitimate users. Open ports are also helpful for non-security scanning since they reveal which services are available on the network.
Closed ports: Although a closed port is accessible (receives and responds to Nmap test packets), no application listens to it. They can be useful in determining if a host is responding to an IP address (host discovery or ping scanning) and in OS detection. Because blocked ports can be reached, it may be worthwhile to scan later if some open up. Administrators may wish to consider using a firewall to restrict such ports. They would then appear in the filtered state, which will be explored more below.
Filtered ports: Because packet filtering prevents Nmap scans from reaching the port, it cannot verify whether it is open. Filtering might be accomplished using a specialized firewall device, router rules, or host-based firewall software. Because they supply so little information, these ports frustrate attackers. Sometimes host answers with ICMP error messages like type 3 code 13. Still, filters are far more typical to simply delete scans without responding. This forces Nmap to attempt the probe numerous times if it was lost due to network congestion rather than filtering. This significantly slows down the scan.
Unfiltered ports: The unfiltered reflect the possibility that a port may be accessed, but it cannot determine if it is open or closed. These ports are only classified by the ACK scan, which is used to map firewall rulesets. Scan unfiltered ports using other scan types, such as Window scan, SYN scan, or FIN scan, to see if the port is open.
Open|Filtered ports: When Nmap cannot detect whether a port is open or filtered, it places it in this status. This is true for scan kinds when open ports produce no response. The absence of response might also indicate that the probe or any response it generated was discarded by a packet filter. As a result, It cannot determine if the port is open or being filtered. Ports are identified using UDP, IP protocol, FIN, NULL, and Xmas scanning.
Closed|Filtered ports: When Nmap cannot detect whether a port is closed or filtered, it enters this state. It’s just utilized for the idle IP ID scan.
Usage
Syntax: nmap [Scan Type(s)] [Options] {<target_ip_address> or <target_url>}- Scanning all ports in a sequence and skipping host discovery
nmap -p- -Pn -r testphp.vulnweb.com| Options | Description |
|---|---|
| -p- | Scan all ports |
| -Pn | Skip host discovery (doesn’t matter active/inactive) |
| -r | Scan ports in a sequence |
Scanning all ports on a system or network can take a long time.
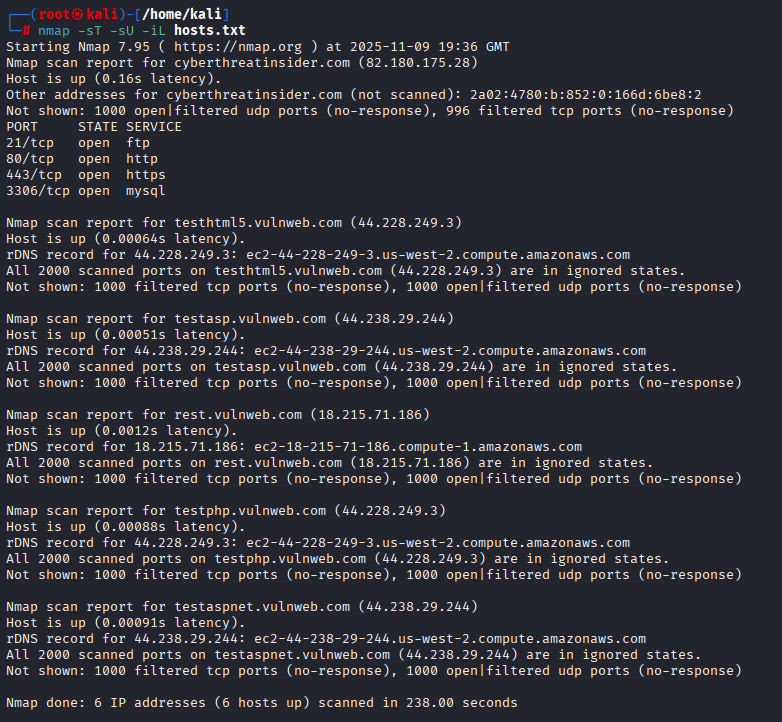
- Scan TCP and UDP ports from the list of targets
nmap -sT -sU -iL hosts.txt| Options | Description |
|---|---|
| -sT | TCP ports |
| -sU | UDP ports |
| -iL <filename> | List of targets (more than one) |
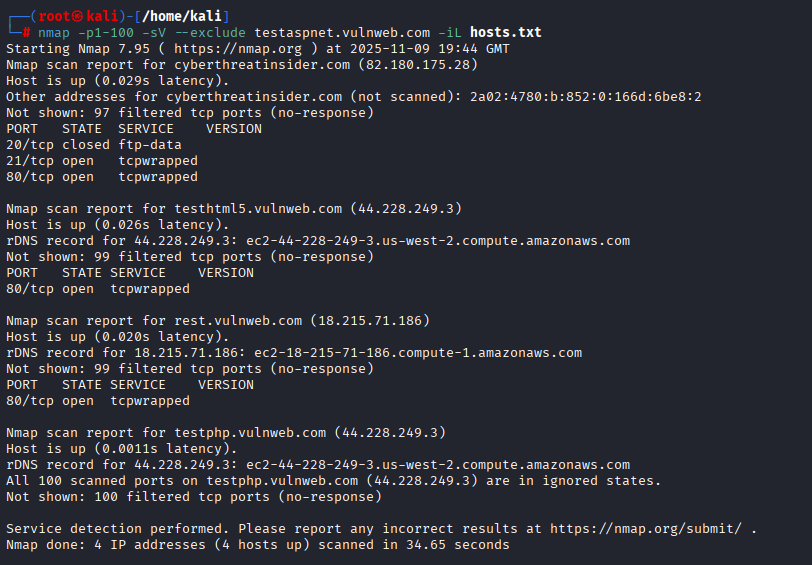
- Specific port, fast, version scan, and exclude one host
nmap -p1-100 -sV --exclude testaspnet.vulnweb.com -iL hosts.txt| Options | Description |
|---|---|
| -p | Specify certain port or define range |
| -sV | Version detection for services running in the port. |
| –exclude <target> | Exclude target from the list |
- Scan the top 100 ports with an aggressive scan and save the output.
nmap --top-ports 100 -O -T2 testphp.vulnweb.com -oN result-nmap.txt| Options | Description |
|---|---|
| –top-ports | Scan common top port |
| -O | Operating System detection |
| Save result | -oN: Normal -oX: XML -oS: Script Kiddie -oG: Grepable -oA: Save output on all format |
| Timing (-T) | -T0: Paranoid -T1: Sneaky -T2: Polite -T3: Normal -T4: Aggressive -T5: Insane |

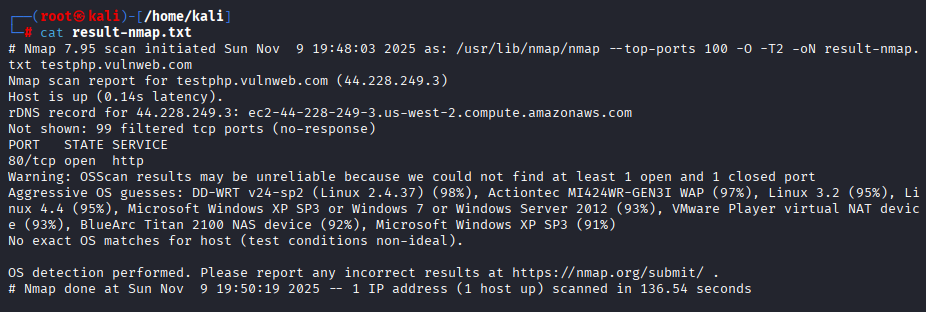
The above image shows how the result may look. The format of the result may vary from different format of files.
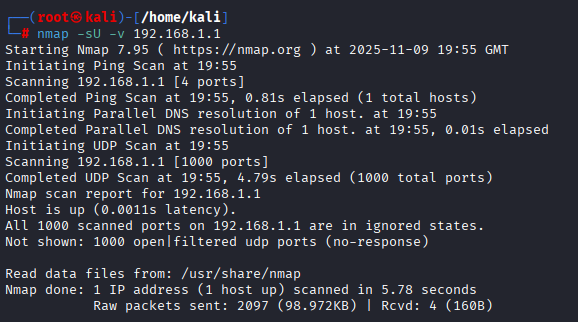
- Scan the UDP port and subnets.
nmap -sU -v 192.168.1.1| Options | Description |
|---|---|
| -sU | UDP port |
| -v | Verbose mode |
How to scan UDP ports with Nmap?
Nmap testing UDP ports is quite similar to testing TCP ports. In fact, the syntax is nearly identical. The main difference is that the “scan type” option must be specified as “-sU” rather than “-sT” or “-sS.” For example, “nmap -sU scanme.nmap.org –top-ports 100 -vv” could scan the live webpage created by the Nmap team for beginners to practice in real-world targets. It will scan the top 100 most common UDP ports and report the results in doubly verbose output. If you don’t want to use the scanme web page, you can use 127.0.0.1 (loopback address).
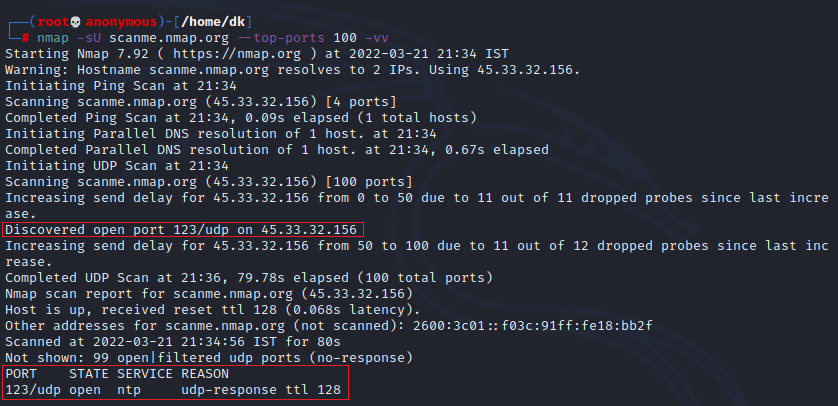
One thing to keep in mind with a UDP scan is that it will take a long time. Because most queries do not obtain a response, the scan must wait for the request to run out. This causes scans to be much slower than TCP scans, which generally provide some type of answer even if a port is closed.
How to scan TCP ports with Nmap?
The scan type option for TCP ports is such as “-sS” or “-sT” rather than “-sU”.
For example, “nmap -sS scanme.nmap.org -vv” here we all know about scanme.nmap.org as mentioned in the above paragraph. It will scan the top 100 most common TCP ports and report the results in doubly verbose output.
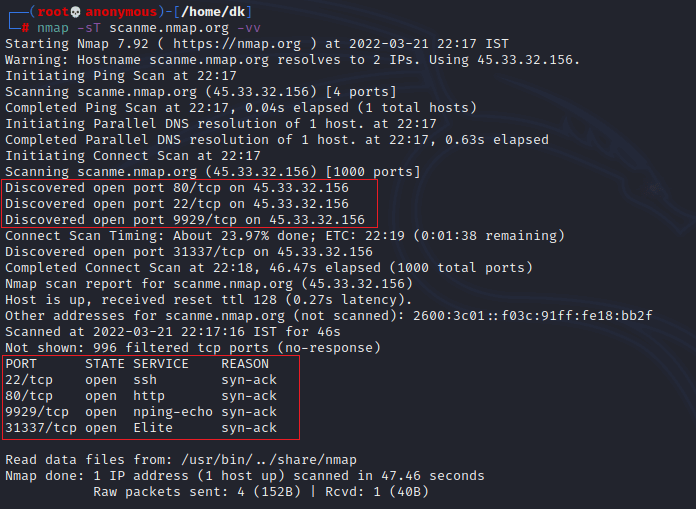
TCP scan is way faster than the UDP scan.
Nmap Searching Engine
By default, Nmap has pre-defined powerful scripts and is very flexible to use. These scripts are used in the Nmap Searching Engine (NSE). All NSE scripts are written in Lua. These scripts can be used for discovery, DDoS, malware, exploitation, fuzzing, and vulnerability scanning.
Read More: How to use the Nmap Searching Engine (NSE) for Network Reconnaissance?
Conclusion
Learning Nmap may significantly improve network security because the tool provides a rapid and effective technique for auditing your systems. Even the program’s essential functions, such as the ability to do port scanning, rapidly identify any suspicious devices operating on your network.
Performing periodic network audits with Nmap can help you avoid becoming an easy target for hackers while expanding your understanding of your own network. Furthermore, It delivers capability that supplements more comprehensive data security solutions.


